Abstract
Frequently the older Scalextric
sets are rescued from long term storage. This article shows that in
six simple steps a typical Scalextric set can be brought back to life
and enjoyed once more.
Introduction
Scalextric sets produced
from 1960 through to around 1990 can be temperamental at times. This
is particularly noticeable when the Scalextric set has been in long
term storage. Numerous fault can occur even when the set is not in use
as well as faults induced by the storage conditions. Damp and high humidity
can cause corrosion and mould growth, dust can coat everything and materials
can age, for example the shrinkage of plastics over time.
This article lists six simple
steps that when followed will ensure an old Scalextric set can be brought
back to life and offer great enjoinment more. The six steps are:
-
Completeness
of the set
- Inspecting for damaged
parts
- Resurrecting the track
- Checking the power supply
and controllers
- Resurrecting the cars
- Upgrading the cars
Part 1 - Completeness
of the set
Any Scalextric set or layout
needs to have all the necessary parts in order to operate properly.
In this first section we'll consider the completeness of your old
set and generate a list of items you'll need to source to get your
set up and running again.
If you have an original
boxed set then the contents will be listed in the relevant Scalextric
catalogue or in the instruction sheet that came with the set.
If your Scalextric set is one with many added accessories, cars and
other parts then it's a case of checking against the generic list
given below.
-
Power
supply
- Hand controllers - at
least 2 off
- Track - a good range of
straights and corners
- Barriers
- Track support pieces for
bridges and banked corners
- Cars - at least 2 off
If any of the above are missing
then sourcing suitable parts will be necessary. Make a list at this
stage as other parts may be needed later, just because something is
present doesn't necessarily mean it will work.
With the track you should
ensure that paired or matching track pieces are present in the correct
quantities, for example if you have a long chicane then you'll need
both an "in piece" and an "out piece". Also if you
have a cross over you'll need to ensure you have two of these, that
is if you want to race 2 cars. Match these track pieces and keep them
together for now.
Every item should be checked
briefly for any obvious damage or missing parts, for example hand controllers
with no attached wires. Items found to be unusable should be put to
one side and added to the list of parts required.
At the end of this section
of resurrecting your old Scalextric set you'll have two piles of parts,
one where the parts look OK to be used and one where the parts cannot
be used. You'll also have a list of missing parts and damaged pieces
that you need to source.
You can, of course, start
sourcing the missing and damaged pieces of your set immediately or wait
until after part 2 where we'll inspect all the parts for damage and
draw up a complete list of what's needed.
Part 2 - Inspecting for
damaged parts
Part 2 of this guide on resurrecting
an old Scalextric set takes a closer look at the quality of the items
you have in your set. In part 1 you may have discarded some components
as clearly damaged and in this part we'll examine the remaining pieces
in a little more detail to identify any parts that are also damaged.
Let's start with the power
supply and controllers. Check the power supply for any visual defects,
missing or incorrect mains plug top, exposed mains wires, damaged mains
wire insulation. If there are any doubts about the mains side of the
power supply then consult a qualified electrician. On the low voltage
side of the power supply (transformer) check that the connection studs
and thumbscrews are present and undamaged. If all looks good then the
power supply can be testing by connecting a 21W car bulb to the output
of the power supply. The bulb should illuminate brightly and consistently.
For the hand controllers,
visually inspect each controller housing and ensure the operating lever
moves through its full displacement smoothly and returns to the fully
off position. Inspect the wires for damaged insulation and confirm the
connection plugs and eyelets are present and undamaged. Connect the
hand throttles to the known good power supply and the output of the
controllers to a 5W car bulb. The bulb should not illuminate with the
hand controller in the off position. Slowly operate the hand controller
and the bulb should illuminate ever more brightly until full throttle
is achieved.
With the power supply and
controllers working correctly it's time to inspect the track pieces.
Firstly check that the plastic connection lugs are all present and correct,
then check for visible corrosion on the steel track rails (orange /
brown rust marks). Light corrosion can be removed with a track
polishing pad but deep pitting will be difficult to remove and a
replacement tack piece will be needed. Check that the conductor rails
wrap around the plastic end lugs such that each track piece electrically
connects to the next, then check the flatness of the track. Many older
track pieces tend to bow in the middle giving very a uneven running
surface.
Some of the specialised track
pieces, e.g. crossovers, have small wires underneath to electrically
connect the track rails together. Visually check these are present and
are making good connections.
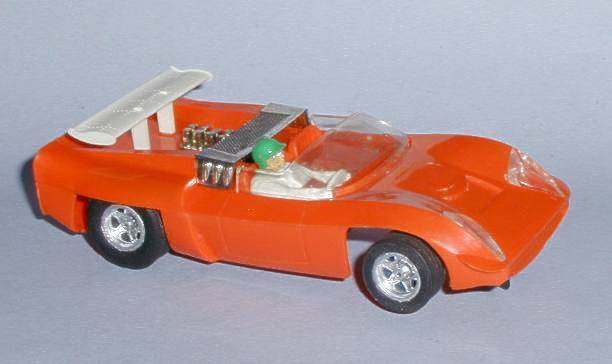
Finally, your Scalextric
cars. Inspect the cars for any obvious missing or damaged parts Obvious
faults to look for are:
If the car looks complete
then the first test is to turn the driven wheels by hand. The wheels
should turn the axle and the motor armature. Feel for freedom of movement
and for binding of the drive system. Any binding, however slight, should
be investigated.
The easiest way to check
the functionally of a car is to connect together the power supply, one
hand controller and one piece of track. Place the car on the track and
with one hand lift the driven wheels off the track surface slightly.
Then apply a very small amount of power with the hand controller. The
motor should hum slightly and the driven wheels should turn slowly.
With some of the older cars the motor will hum but the wheels may not
turn, this is normal.
Then apply around one third
throttle and the motor pitch should increase and the wheels turn faster.
If the wheels do not turn then stop this test as there is a fault which
will need to be investigated. Listen for a repeating clicking sound
from the car. If this is heard then stop the test as there may be a
fault with the drive gears. Further investigation will be required.
With the driven wheels turning
freely on one third throttle the next step is confirm the condition
of the electrical connections. Still at one third throttle, pivot the
car around the guide pivot slowly in one direction until the end stop
is reached, now back in the other direction until the other end stop
is reached. If the motor hesitates during the test then the wiring and
connections will need further investigation.
These checks and tests will
give you a good indication of what parts of your Scalextric set are
damaged and need to be replaced or repaired.
Part 3 Resurrecting your
track
Now that all the damaged
parts of your old Scalextric set are identified it's time to start to
get things into working condition. In part 3 of this guide we'll look
at your track and get it into full working order. There are a couple
of common problems with old Scalextric track:
- Dull and rough metal track
rails
- Bow in the track surface
along the track piece length
- Narrowing of the slot
between the track rails
- Dirty and dusty track
surface
Let's start with the dirty
and dusty track surface. Just like a real race track, the surface of
your Scalextric track is vital for grip and the performance of your
cars. Track that has been stored well may need nothing more than a wipe
over with a damp cloth. However, very dusty track may need a good scrub
with an old nail brush in warm soapy water. We recommend adding washing-up
liquid as this will also remove any oil and grease deposits. Dry the
track quickly to prevent any further corrosion of the track rails.
With the track clean the
next step is to flatten out any bowing or kinks in the running surface.
This is accomplished by gently bending the track back to a flat level
surface. While doing this you may find that the track rails buckle into
the slot, blocking the slot. This is normal and should not be considered
a problem at this stage. The important point is to get the track as
flat and level as you can.
Now that the track pieces
are all clean and flat we can take a look at the slot between the track
rails. Some track pieces may have a narrowing of the slot especially
towards the ends of the track piece. This is usually caused by the steel
rails not being crimped well to the plastic track moulding. Tightening
of the crimping will resolve this. Then, you may find that the slot
narrows at the very end of the track piece where the next track piece
will electrically connect. This is resolved by pushing the track back
into shape with a flat blade screwdriver. The same technique is used
for any localised bucking along the slot length, simply push the buckle
out of the way to open up the slot.
Finally the running surface
of the track rails need to be polished back to bright, shiny metal.
This will give better electrical connection to the car giving higher
speeds and better acceleration. Also, there will be less rolling resistance
to the car and far less ware on your pick-up braids. The track
polishing pad is ideal for this task bringing your track rails back
to shiny metal easily. Even light corrosion can be removed but deep
pitting will be difficult to remove.
By now your track will be
ready for use with a good, clean track surface and bright shiny, smooth
track rails. Time to design your layout ...
Part 4 Checking the power
supply and controllers
Part 4 of this guide on
resurrecting your old Scalextric set takes a closer look at the power
supply and controllers you have in your set. In part 2 you may have
discarded some of the power supply and controller components as clearly
damaged and in this part we'll examine the remaining pieces in a little
more detail to identify any parts that are also damaged or not functioning
correctly.
Let's start with the power
supply. Check the power supply for any visual defects, missing or incorrect
mains plug top, exposed mains wires, damaged mains wire insulation.
If there are any doubts about the mains side of the power supply then
consult a qualified electrician. On the low voltage side of the power
supply (transformer) check that the connection studs and thumbscrews
are present and undamaged. If all looks good then the power supply can
be testing by connecting a 21W car bulb to the output of the power supply.
The bulb should illuminate brightly and consistently.
The power supply should emit
a quiet humming sound and if this sound is louder than expected then
the transformer itself inside the power supply is at fault. If the humming
sound is excessive then the whole power supply may need to be replaced.
Repairing or replacing the transformer can be carried out by a fully
qualified electrician.
Some of the earlier power
supplies are also fitted with a manual reset button which switches off
the output of the power supply if there is a short circuit in the output
or if too much current is drawn. This can be checked by deliberately
connecting together the output terminals for a short duration. The output
protection device should then disable the output of the power supply.
The reset button can then be pressed to re-energise the output of the
power supply. Later power supplies also have this protection device
which automatically resets itself after a few seconds.
Various replacement
powers supplies are available if needed.
For the hand controllers,
visually inspect each controller housing and ensure the operating lever
moves through its full displacement smoothly and returns to the fully
off position. To do this operate the trigger slowly to the full power
position and then release it very slowly until at the fully off position.
Inspect the wires for damaged
insulation and confirm the connection plugs and eyelets are present
and undamaged. Connect the hand throttles to the known good power supply
and the output of the controllers to a 5W car bulb. The bulb should
not illuminate with the hand controller in the off position. Slowly
operate the hand controller and the bulb should illuminate ever more
brightly until full throttle is achieved.
Replacement
hand controllers are available if needed.
Part 5 Resurrecting the
cars
Part 5 of this guide on
resurrecting your old Scalextric set takes a closer look at resurrecting
your old Scalextric cars. In part 2 you should have inspected your
cars for any obvious missing or damaged parts. The obvious faults
to look for are:
If you haven't carried
the inspection of your cars as covered in part 2 of this guide then
you should do so now before preceding with the process below.
-
Carefully
take your car apart to the major components. Some Scalextric cars
are held together with screws, some with sliding clips and some
where the chassis clips into the body.
Note: Some cars are
difficult to unclip the body from the chassis, if in doubt then
contact us for
further information.
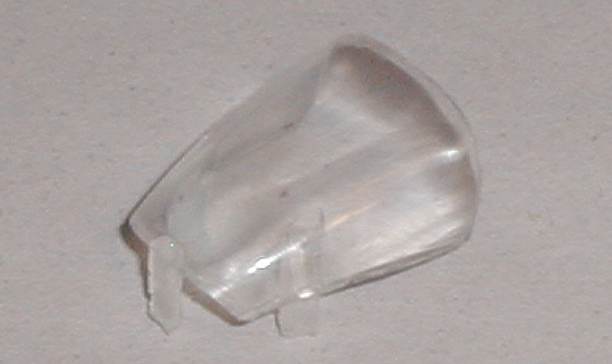
-
All the
plastic parts (body, window moulding, chassis, driver plate, wheels
etc.) can then be cleaned in warm soapy water. Use a nail brush
or similar to remove all the dust and dirt. This will most likely
also remove any water
slide decals that have been added to the car. The plastic mouldings
may have become brittle with age so support them while applying
pressure with the nailbrush. Once the plastic parts are clean rinse
them off with fresh water and dry thoroughly. Some of the cars from
the 1960s tend to have a white powdery mould growing on them. This
can be removed through repeating this cleaning process until all
the mould has gone.
-
Once clean
and dry inspect the plastic parts for for any damage. Parts not
suitable should be discarded and replacements sourced.
- The motor
should have a small drop of lubricating oil on each bearing and then
be tested at full speed for a short period of time and at race temperature
to test the bearings, the armature windings and the motor brushes.
If the motor fails any of these tests then replace it as it would
be of little use under race conditions. The open frame RX and Formula
Junior motors can sometimes be repaired, see our article "How
to service the RX motor in your Scalextric car" to find out
more.
- The wiring
to the motor should be checked and repaired as necessary. If you are
in any doubt about the condition of the wiring then replace it as
a damaged conductor can be hard to find and can ruin a good car.
- The white plastic motor
pinion gear fitted to cars from the late 1970 through to the late
1990s can crack and become loose on the motor shaft. Check for this
and replace the motor pinion gear if you are unsure.
- Check the condition of
any other electrical items fitted to your car, usually lights. On
some cars the lighting circuits are polarity sensitive as they are
fitted with LEDs which are polarity sensitive. Replace blown or damaged
bulbs.
- Reassemble the bearings,
spacers and wheels onto the axles.
If the wheels are loose on the axles then a small drop of super glue
will keep them in place.
- Refit the axles to the
chassis. They should be a secure fit and rotate freely.
Note: For the rear axle the large flat disc of the
contrate gear should be on the RIGHT of CENTRE as
viewed from the UNDERSIDE of the car. If the rear
axle is fitted the wrong way round the car will go backwards.
- Refit the motor and all
the other electrical items to the chassis / body of the car. Use new
pick-up
braids and new pick-up pins (if pins are used on your car). The
old pins, especially if crimped to the wires can be a common cause
of open circuit wires. There are 2 sizes of pick-up pins are available,
1.75mm
and 1.95
mm, if you are not sure which you need then contact
us.
- Fit new
tyres to the rear (driven) wheels unless your original tyres are
in very good and grippy condition. Front (non-driven) wheels can take
visually good used tyres. Give all the bearings and gears a drop of
oil to enhance performance and prolong their life. Check the gears
for smooth and free operation. If you feel any resistance then contact
us for further information.
- If all is well then put
the chassis on the track and ensure the car is OK electrically and
goes in the right direction. If the car goes in the wrong direction
then swap over the wires at either the guide OR the
motor.
- Refit all the parts back
into the body, windows, driver plate etc.
- The assembled upper body
can now be re-fitted to the completed chassis. Carry out the tests
from part 2 of this guide once more to confirm the car is functioning
as well as can be expected. Run the car on the track confirm the tyre
grip.
- Finally, the ancillary
or decorative parts can be fitted, e.g. bumpers,
wing mirrors , spoilers etc. and decals.
With the cars, track, power
supply and controllers all working correctly it's time to race and
have some fun.
Part 6 Upgrading the cars
Part 6 of this guide on
resurrecting your old Scalextric set takes a closer look at upgrading
your old Scalextric cars. In part 5 you should have restored the cars
so that they run like they did when they were new. Unfortunately that
means they are no match for the modern range of Scalextric cars and
suffer all their original handling and performance problems.
Upgrades to a Scalextric
car essentially fall into one of two categories, those that are totally
reversible and those that are not totally reversible. The upgrades
that are totally reversible are the best to start with as you can
undo the upgrades and get your original car back. These upgrades are:
-
Just as
with a full size car, a Scalextric car relies on its tyres (rear
tyres) for traction, braking and cornering. Simply put, the better
the grip of the tyre the better the performance of the Scalextric
car. For many Scalextric cars there are higher performance tyres
available. The very best results are obtained with our max grip
series of tyres.
-
The next
step is to increase the power of the motor. If your car has an RX
open frame motor then use an adaptor kit and fit a Johnson
motor. If your car has a Johnson motor then again use an adaptor
kit and fit a Mabuchi
motor. If you already have a Mabuchi motor fitted then consider
one of the latest and more powerful versions of the Mabuchi motor.
If you are not sure which motor you have then use our free Library
of motors to identify your motor.
-
Adding
weight to your Scalextric car can make it more stable in the corners
and accelerate more quickly. Weight over the rear driving wheels
will reduce wheel spin by increasing the friction between the tyres
and the track. For the Engineers this is simply a case of F=µN.
Adding weight increases N and therefore proportionally increases
F, the friction. Use Bluetac and steel ball bearings to put the
weight where you need it.
- The Scalextric cars from
the 1970s and 1980 had a tendency to tip over in corners due to a
floating front axles. This effect can be reduced by replacing the
current axles with wider ones which increases the stability of the
car in corners allowing corners to be taken at higher speeds.
The upgrades above can be
carried out to most older Scalextric cars and can be adjusted and removed
as necessary. The upgrades that are NOT reversible are the next to try.
Which, if any, of these you try will result in permanent alterations
to your car which may affect its value. If you are unsure DO NOT proceed
with these upgrades:
-
- Lower the guide height
- Fix the height of the
front axle
- Adding a magnet
to your Scalextric car will give an instant performance increase if
fitted in the right location. Remember that the magnet will also give
the car an increase in rolling resistance and so can be overdone.
Use magnets only with Mabuchi
motors for best effect. The best place to fit a magnet is just
in front of the rear axle between the rear axle and the motor. This
will give the best grip for the rear tyres.
- By lowering the guide
the centre of gravity of the car is lowered too. This will give your
car more stability in the corners. Note that it is not possible to
lower the guide on all Scalextric cars.
- With most of the older
Scalextric cars the front axle is allowed to move up and down. This
allows the car to traverse the banked corners and obstacles in the
track. If your track is mostly flat then the front axle can be fixed
in location giving a great increase in cornering stability. The front
wheels should be placed so that they just touch the track with the
weight of the front of the car still on the guide blade.
There are, of course, many
other upgrades you can make to your Scalextric car to improve its
track performance. The points listed here are the more common ones
and the ones that can make a big difference to the car with the least
amount of effort. For other ideas and some test results have a look
at what happened as we upgraded
an old Scalextric C52 Ford Escort RS1600.
This concludes our series
on how best to resurrect your old Scalextric set. We hope you've enjoyed
this series of articles and found them helpful. If you have any feedback
please let us know.
About the author
Gary Harding has been working
with Scalextric cars for over 30 years and now operates Scalextric Car
Restorations in the UK. Scalextric Car Restorations is a Worldwide internet
based business that offers for sale high quality Scalextric cars and
Scalextric spares and parts from the 1960s to the present day. All the
restoration work is carried out to the highest standards with the highest
quality parts available. Only the best cars are selected and the final
result is a car that is genuinely like new.
Further help and advice relating
to this article or Scalextric cars in general can be found at:
http://www.scalextric-car.co.uk